Creating a template
Making a Microweber template is easy. You just have to make a new folder in userfiles/templates/.
The template folder name must be in lowercase, and must not contain spaces or special characters, besides unserscore and dash.
Lets make a folder called my_template at userfiles/templates/my_template
Setting up the basic files.
Make few files in your new folder.
/userfiles
    /templates
        /my_template
         config.php
         header.php
         index.php
         footer.php
         clean.php
Set the template name in the config.php file
Open userfiles/templates/my_template/config.php and put this code
<?php
$config = array();
$config['name'] = "My template";
$config['author'] = "My name";
$config['version'] = 0.1;
$config['url'] = "http://example.com/";
This will make your template appear in the admin panel
Making header and footer
Every template needs header and footer files. They can be loaded within the template layouts to add the common styles and scripts needed for the website.
header.php
<!DOCTYPE HTML>
<html prefix="og: http://ogp.me/ns#">
    <head>
        <title>{content_meta_title}</title>
        <meta http-equiv="Content-Type" content="text/html; charset=UTF-8">
        <meta http-equiv="X-UA-Compatible" content="IE=edge">
        <meta name="viewport" content="width=device-width, initial-scale=1, user-scalable=no">

        <!--  Site Meta Data  -->
        <meta name="keywords" content="{content_meta_keywords}">
        <meta name="description" content="{content_meta_description}">

        <!--  Site Open Graph Meta Data  -->
        <meta property="og:title" content="{content_meta_title}">
        <meta property="og:type" content="{og_type}">
        <meta property="og:url" content="{content_url}">
        <meta property="og:image" content="{content_image}">
        <meta property="og:description" content="{og_description}">
        <meta property="og:site_name" content="{og_site_name}">

        <!--  Loading CSS and Javascripts  -->
        <link rel="stylesheet" type="text/css" href="<?php print template_url(); ?>css/style.css" />
        <script type="text/javascript" src="<?php print template_url(); ?>site.js"></script>

    </head>
    <body>
You can use the template_url() function to get the URL to the template folder. Also there is template_dir() for the full filesystem path of the template.
The curly brackets text like {content_meta_title} is replaced with the appropriate content when the site is rendered.
footer.php
Put any closing tags in the footer and also common content like menu, copyright info, etc.
    </body>
</html>
Adding navigation menus, logo, etc.
Its common that we put a navigation in the site header and also design elements that are used on all pages. Also we can put global editable regions, so the user can change its logo and text in the header.
You can load modules inside your template with the <module type="name_of_module" /> tag.
<!--  ... </head><body> ... continued from header.php  -->
<div id="header">
    <div class="edit" rel="global" field="header">
        <h1><a href="<?php print site_url(); ?>">My template</a></h1>
        <module type="menu" name="header_menu" id="main-navigation" template="pills"  />
    </div>
</div>
<!-- ... from footer.php -->
<div id="footer" class="edit" field="footer" rel="global">
<div>Copyright © <?php print date('Y'); ?> All rights reserved</div>
<module type="menu" name="footer_menu" />
</div>
</body></html>Template layouts
Each template is made of "layouts"
Think of layouts as "pages" of your template. You can have just one layout... or as many as you like.
The vast majority of sites need more complex structure and that can be accomplished by adding a variety of page layouts to your template folder.
Microweber allows you to have different layouts for different pages in your site. Although each page layout can be different you can define common regions such as a “header", “footer" and a “sidebar” to share among layouts.
Every template can have multiple layouts. Besides a simple page, you can make different page layouts that can be used by the users and chosen at the page creation process.
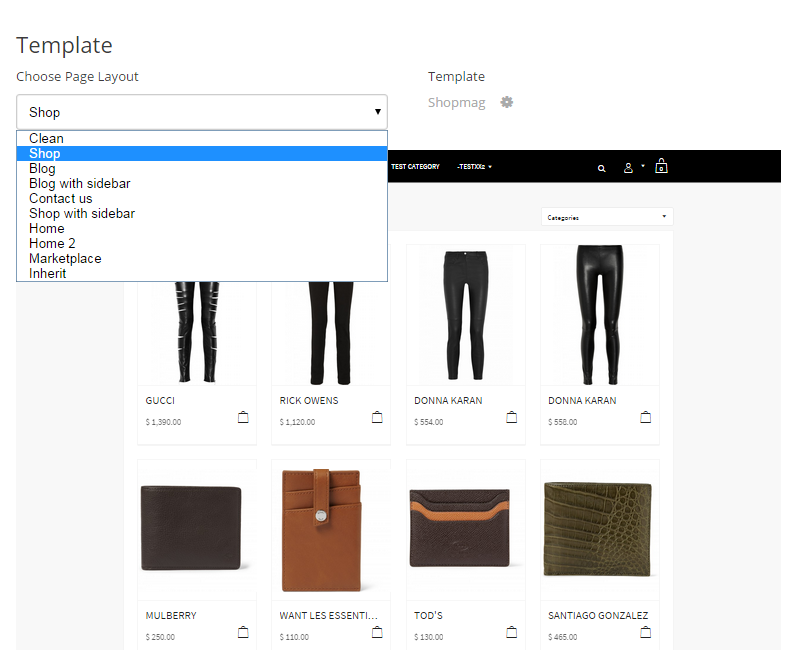
Example of layouts usage is to allow the user to have different looking pages for their blog, shop or contact us
Making layouts
The layouts are located in your template folder or its sub-folders.
For example: userfiles/templates/my_template/layouts/
The layout files are simply php files located in any sub-folder of your template. Microweber recognizes a layout file by scanning the template folder for php files which contains the following code in them.
<?php
/*
  type: layout
  name: My layout
  content_type: static
  description: My sample layout
*/
?>
Those layouts can show content from the current page or from other pages. They can even have shared editable regions. All you need to do is include your modules and write your code in the layout file.
index.php
userfiles/templates/my_template/index.php
The index.php file is used as a homepage layout. This is your first layout. Layouts can be different for every page and this is defined from the admin, on the create page window.
<?php
/*
  type: layout
  content_type: static
  name: Home
  description: Home layout
*/
?>
<?php include template_dir(). "header.php"; ?>
<div class="container">
    <div class="edit" field="content" rel="content">
        <h2>Welcome to my homepage</h2>
        <p>This is my Microweber template</p>
        <p>You can edit this text, just click here and start typing</p>
    </div>
</div>
<?php include template_dir(). "footer.php"; ?>
We have created editable field in our layout by adding class edit to html element of our choice.
clean.php
userfiles/templates/my_template/clean.php
This layout is used as default for pages and also as a fallback layout if no other layout can be found.
<?php
/*
type: layout
content_type: static
name: Clean
position: 2
description: Clean layout
*/
?>
<?php include template_dir(). "header.php"; ?>
<div id="content">
  <div class="container edit"  field="content" rel="content">
    <p>This is my text</p>
  </div>
</div>
<?php include template_dir(). "footer.php"; ?>
Creating blog layout
In a site where we want to have separation of how the pages and the posts look we will need to create different layouts for them.
Here, for example, is how we would make a layout for a blog page with a posts module and a sidebar.
Make a new file at userfiles/templates/my_template/layouts/blog.php, this file will load when you create new page with the "Blog" layout.
blog.php
<?php
/*
  type: layout
  content_type: dynamic
  name: Blog
  description: Blog layout
*/
?>
<?php include template_dir(). "header.php"; ?>

<div class="container">
    <div class="blog-content edit" field="content" rel="content">
        <h2>Check out my posts</h2>
        <module type="posts" />
    </div>

    <div class="blog-sidebar edit" field="sidebar" rel="inherit">
        <h2>My sidebar</h2>
        <module type="categories" />
    </div>
</div>

<?php include template_dir(). "footer.php"; ?>
Creating layout for post
We can have an inner page to show the posts added to our blog. Create a file blog_inner.php at userfiles/templates/my_template/layouts/blog_inner.php to show posts added the blog layout pages.
You can also make a file called post.php or inner.php in the root of the template folder and use it as a default for posts in all pages.
blog_inner.php
<?php
/*
  type: layout
  content_type: static
  name: Post
  description: Post layout

*/
?>
<?php include template_dir(). "header.php"; ?>

<div class="container">
    <h1 class="post-title edit" field="title" rel="content">My post title</h1>
    <div class="blog-post edit" field="content" rel="content">
        <p>My post content</p>
    </div>
    <div class="blog-comments edit" field="post-comments" rel="content">
        <module type="comments" />
    </div>
    <div class="blog-sidebar edit" field="sidebar" rel="inherit">
        <h2>My sidebar</h2>
        <module type="categories" />
    </div>
</div>

<?php include template_dir(). "footer.php"; ?>
Notice that we added two editable regions and comments module to our inner layout.
Creating shop layout
If we want to have a shop pages in out template we will need to make a shop layout and a layout to display products from the shop.
The shop layout is created by including is_shop property in the definition of the layout file.
You can add products only to pages that are defined as shop by using a shop layout.
Make a new file at userfiles/templates/my_template/layouts/shop.php, this file will load when you create new page and choose the "Shop" layout.
shop.php
<?php
/*
type: layout
content_type: dynamic
name: Shop
is_shop: y
description: Shop Layout
position: 3
*/
?>
<?php include template_dir(). "header.php"; ?>

<div class="container">

    <div class="edit" field="content" rel="content">
        <p>My shop page</p>
    </div>
    <div class="edit" field="shop-products" rel="content">
        <module type="shop/products" />
    </div>

    <div class="shop-sidebar edit" field="sidebar" rel="inherit">
        <h2>Shop sidebar</h2>
        <module type="categories" />

        <h4>Shopping Cart</h4>
        <module type="shop/cart" />
    </div>
</div>

<?php include template_dir(). "footer.php"; ?>
As you may notice we have loaded the "categories", "shop/products" and "shop/cart" modules in our layout
Creating product layout
We can want to have a custom layout to show each of our products.
Create a file shop_inner.php at userfiles/templates/my_template/layouts/shop_inner.php to show products added the shop pages. You can also make a file called product.php in the root of the template folder and use it as a default for products in all pages that doesn't have inner layout.
shop_inner.php
<?php
/*
  type: layout
  content_type: static
  name: Product
  description: Product layout

*/
?>
<?php include template_dir(). "header.php"; ?>

<div class="container">
  <div class="edit"  field="content" rel="content">
      <module type="pictures" rel="content" />

      <div class="edit"  field="content_body" rel="content">
        <p class="element">My product text</p>
      </div>

      <module type="shop/cart_add" />
  </div>
</div>

<?php include template_dir(). "footer.php"; ?>
Creating a "Contact us" layout
In order to have all our layouts for a complete site, we will want to have a contact us layout. This is just a simple layout with some text and contact form.
Make a new file at userfiles/templates/my_template/layouts/contact_us.php
<?php
/*
type: layout
content_type: static
name: Contact Us
description: Contact us layout
position: 7
*/
?>
<?php include template_dir(). "header.php"; ?>

<div class="container">
  <div class="edit" field="content" rel="content">
    <h3>Find us on the map</h3>
    <module type="google_maps" />
    <h3>Or fill our form</h3>
    <module type="contact_form" />
    <div class="edit" field="content_body" rel="content">
      <h3>Address</h3>
      <hr>
      <p> 123 My place, Sofia 1000, Bulgaria </p>
    </div>
  </div>
</div>

<?php include template_dir(). "footer.php"; ?>
Where to go next?
Learn how to create skins for the modules that you use in your template.